
THE RIVETER
SUPPLIES NEEDED:
Paint Shop Pro Vers. 9+
Animation Shop 3
Your tube of choice. Tube used for this particular tutorial is by Yours Truly @ Designs by Kiya.
You must have a license to use it.
Kit – Racing the Clock by Pink Paradox Productions
You are also welcome to use a kit of your choice that fits the theme.
Fire Animation
Template
Masks of Choice
Fonts of choice or Selfish
Plugins:
Alien Eye Candy 5 (the latest version is 7 though and site allows free trials)
Xero
SUPPLIES (template + animation)
REMEMBER TO SAVE OFTEN!
1. Unzip and open files provided in supplies folder. Choose Template-001. You can choose to resize it to a dimension that works best for you. For purposes of this tutorial, I am leaving as is.
2. Open up your Riveter tube (or tube of choice). Copy and paste as new layer. Resize by 35% and position as seen in tag above. Adjust – Sharpness – Sharpen. To give my tubes a bit more ‘color’ or ‘depth’, I duplicate the tube layer. Double click the copy layer, change the blend mode to ‘Soft Light’. Merge both tube layers.
3. Make the ‘Rectangle’ layer active. With your magic wand, click inside the shape. Go to Selections – Modify – Expand – Type in 4 for the pixels width – Click OK. You should have matching ants within your rectangle now.
4. Open your kit and pick a paper of choice. For this, I chose Paper (52). Copy and Paste as new layer beneath rectangle layer. Resize by 80%. Sharpen. Your matching ants should still be within the rectangle. As seen below:
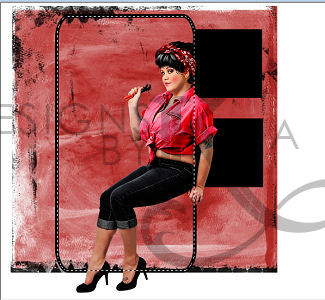
5. Go to Selections – Invert – Making sure you’re on the Paper Layer, hit the delete key. Selections – Select None. Duplicate the paper layer. On the copy, change the blend mode to ‘Multiply’ and then merge both paper layers together.
6. Copy and Paste your tube again as a new layer. Paste this tube layer above the paper layer. With your selection wand, click inside the rectangle layer again. Selections – Modify – Expand – 4 – Click OK. Selections – Invert – making sure tube layer is highlighted – Delete. Select None.
7. By the way, if you haven’t already, make sure you crop your entire tag! That way you don’t have ‘excess’ tube or paper hanging off the canvas.
8. Duplicate the tube layer. Go to your filters and choose the filter Xero – Grey Tinter – default settings, and just hit the OK button.
9. With your eraser, using the settings below, erase random areas on the grey-tinted layer. I just ‘dab’ certain parts like the face and a bit of the shirt and hair.

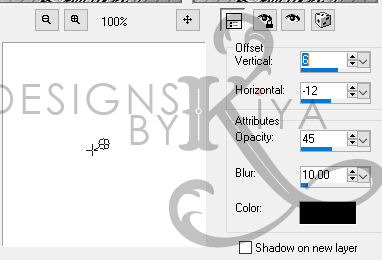
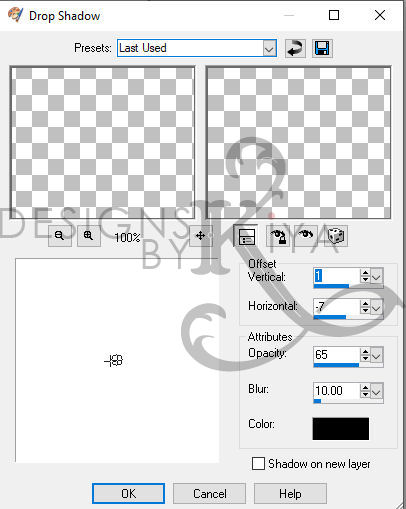
10. Merge both tube layers together. Add drop shadow with the settings below (Erase any shadows that leak out of the rectangle)
11. Duplicate your tube layer. Change top blend mode to ‘Screen’ – 30%. Then go to Adjust – Blur – Gaussian Blur – Radius 3 – Hit OK. Merge both tube layers again.
12. From your kit choose Paper 57. Place this above the tube layer. Repeat Steps 4 and 5. The only difference is that you will not duplicate or change blend mode your paper the same way. Once your paper is in place, go to next step below.
13. Change blend mode of paper to ‘Overlay’. Decrease opacity to about 65%.
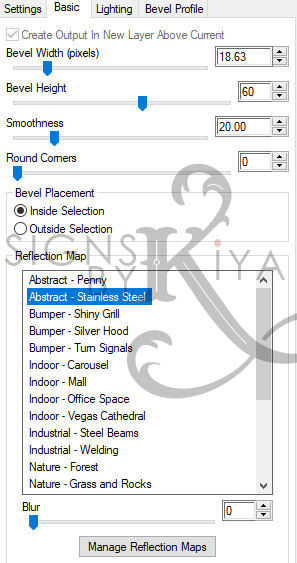
14. Now to work on the frame! Since we’re going with a grungy-machinery theme, I am going to use the filter chrome. Highlight the rectangle layer. Go to your filters, Alien Eye Candy 5 – Impact – Chrome with these settings:
15. Duplicate your new Chrome layer. Change copy layer blend mode to ‘Multiply’. Merge both layers. Apply drop shadow with these settings:
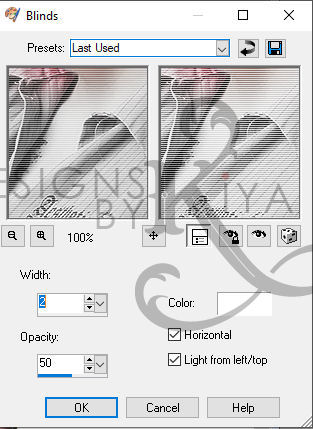
16. Within your rectangle, merge the tube layer with the paper beneath. Go to your filters – Texture Effects – Blinds – and use the settings below:
17. Now to work on our smaller squares. Since I’m going to be doing the same thing for both squares, everything I say for one, just repeat it for the second.
18. Select either Square-Top or Square-Bottom. In my case, I am working on the Top first. With your magic wand, select the square until the marching ants appear around it.
19. Choose a paper from the kit, this time, I’m picking Paper (27). Copy and paste as new layer on top of marching ants square. Resize to about 40%. Sharpen. Go to Selections – Invert- making sure your paper layer is highlighted, delete.
20. Copy and paste your tube on top of your paper square. Resize to about 45%. Sharpen. Position as you see in tag above. Selections tool, select the original square template to get the marching ants. Invert and making sure your tube layer is highlighted, delete.
21. This is the part where I tell you to play around with your filters as we will be basically repeating what we did in the big rectangle. I won’t repeat everything here, so go back and read through all the steps to achieve the final result. Bottom line, you can play around with your filters and papers to get different results.
22. When you’re done with your squares, you can apply a drop shadow of your choice or use settings below:

23. Okay, time to place your elements. I don’t want to use too much for this tag, and I won’t go about listing where to place stuff. You can just see the tag example above and follow the same pattern or do your own thing!
24. When satisfied with your elements, apply drop shadow setting of your choice. Don’t forget your tube as well!
25. Masks and overlays all came with the kit, so as before, you can use your own masks or overlays to add more depth to your tag.
26. Add your copyright information at this point.
27. You can now add a text of your choice. Font used is called ‘Selfish’.
ANIMATION TIME:
Now either I’m super rusty at this or this took a bit longer than I anticipated. Either way, patience is required for this if you hope to get the same result, so let’s go!
1. Open Animation Shop.
2. Open the fire animation mng file provided. Since it’s quite a large file, go to View – Zoom Out by 1 to see the whole thing. Then click on ‘Edit’ and ‘Select All’ so all 16 frames are highlighted at the same time. Then click on ‘Animation’ and ‘Flip’, so the animation is now upside down.
3. Making sure all frames are still highlighted, go to ‘File’ – Export Frames – To Paint Shop Pro. You should now see all 16 frames in your PSP canvas.
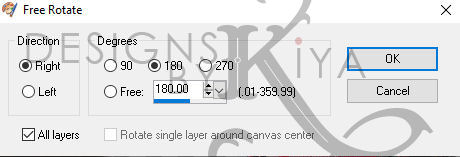
4. Note that steps 2 and 3 are not necessary if you are using the PSD file version. For that, all you have to do is just open up the PSD animation file in PSP and voila! Same result. Oh, and of course to flip the PSD file, just go to Image – Rotate – Free Rotate – and these settings:
5. Now back to our tag template. Close out all layers right above the rectangle (so we can see what we’re doing basically). Now, click on the layer below the rectangle. Create a new blank layer, let’s rename it as ‘BLANK’. Now click on ‘New Layer Group’ icon and name it as ‘FIRE’.
6. (Un)Fortunately? I’m still using the original Jasc version and in this, there’s no quick way to drag and drop all layers into this, so we’re going to one-at-a-time copy and paste our fire layers into this FIRE group we’ve just created.
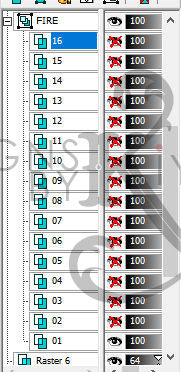
7. Create 16 new raster layers within your FIRE group. Rename them as 01, 02, 03 etc. Then delete ‘BLANK’ layer. It should look like this when done:
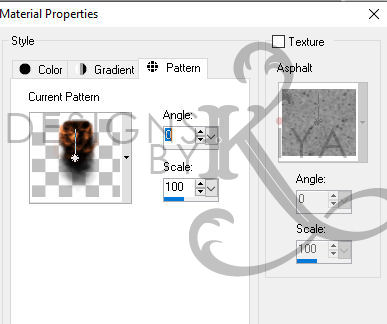
8. On your fire animation, close out all the layers leaving only layer 1 open. Make it active. Now click on your foreground color. In the box that pops up, choose the ‘PATTERN’ tab. Choose the fire pattern – Angle (0) Size (100).
9. Go back to your tag and flood fill layer ‘01’ with this. Close out ‘01’ and make ‘02’ active. Repeat process for the fire animation (making the second layer active and closing out the first one). HOWEVER, when you go back to Pattern, MAKE SURE you pick the regular numbered fire pattern instead of picking the one that says ‘current’ (if you choose current, you’re just repeating the same animation used before)
10. Now you should have all 16 fire layers within your FIRE group. Collapse the group by clicking on the minus (-) sign beside the layer. Making sure that layer is highlighted, drag and reposition within the frame so it fits within it.
11. Make rectangle/frame layer active. With magic wand, click inside the frame, go to Selections – Modify – Expand – 13. Selections again – Invert. Now open up your FIRE group (hit the + sign) and hit delete on each layer to get rid of the excess flames. Selections – Select None.
12. Collapse FIRE group again. Making sure it’s active, double-click and change the blend mode to ‘Overlay’.
13. Now open up all the layers above the frame layer that you closed earlier so the whole tag is complete/visible. Go to Selections – Select All – there should now be matching ants around your tag.
14. Open up your FIRE group. Close all the fire layers except for 01. Make 01 active. Right click on your tag and choose ‘Copy Merged’. Paste as new animation in Animation Shop.
15. Go back to PSP. Close out 01. Make 02 active. Copy merged and in Animation Shop, click on Edit – Paste – After Current Frame. Continue this pattern until you have 16 frames in Animation Shop.
16. Click on Edit – Select All – so all frames are highlighted. Then click on Animation – Frame Properties – 15 (or however fast or slow you want to make it). Then click on View – Animation and see the finished result. If satisfied, save as .gif and you’re set!
Might have been a long process, but at least I hope you learned something new from it.
There's no limit to where your imagination and creativity can take you, so use whatever you've learned here and explore all possibilities! :D
Please no hotlinking the images! Neither can you use the tags created for your personal use or on blogs or websites without written permission. This tutorial is registered with TWI.
© KiyaSama - all rights preserved. Tutorial Written 6th April, 2009.
Tutorials Home
|
|