
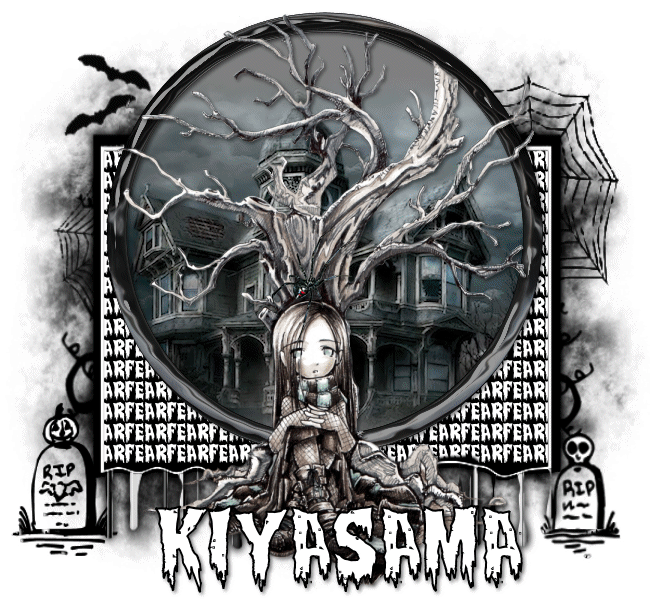
MY GREATEST FEAR
SUPPLIES NEEDED:
Tube and Dark Spooky image of choice – I’m not sure of the artist of this particular tube, so please do not hesitate to let me know who created it and credit will be given.
Plug ins – Eye Candy 5 – Impact – Chrome
Plug ins – Mura Meister – Cloud and Copies
Tube of creepy crawly of choice – I’m using the spider that came with the PSP program.
Mask of choice
SUPPLIES – contains tube/image/mask and spider.
Fonts of choice or – Creepsville
Jasc Animation Shop 3
REMEMBER TO SAVE OFTEN!
1. Open image 650x600 – transparent UNCHECKED – color white.
2. Set your foreground color palette to black, background null. Choose your ellipse preset shape and with stroke width set to 20, draw out a large (not too large though!) circle in the middle of your tag. Move this towards the top of your image – objects, align, horizontal center in canvas. Once done, convert this layer to raster.
3. With your magic wand, click inside this circle. Selections – Modify – Expand by 3.
4. New raster layer – set foreground color palette to a gray-ish hue (#808080) – floodfill this layer with the color. Do NOT de-select yet.
5. Make your circle frame layer active again.
6. Open your dark image. Copy and paste as new layer on your tag. Resize by about 60% and position. Selections – Modify – Invert – Delete. Move this dark layer beneath the circle frame. Selections – Select None.
7. Make your circle frame active. Selections – Select All – Float – Defloat. You should have marching ants around your frame now.
8. Effects – Plug ins – Eye Candy Impact – Chrome – Black Latex on default settings. Apply.
9. Add light drop shadow to frame. I’m using the settings 2,2,50,5.
10. Copy and paste your tube as a new layer and position as you see on my tag.
11. Open new image – 200x200 – transparent CHECKED.
12. Select your tube tool and look for ‘BUGS’. Set scale to about 60 and click a bug of your choice onto your working image. I’m using the spider for this one.
13. Make your tube layer active (if it wasn’t already) and copy and paste your tube on top of it as a new layer. It should be positioned on top of the girl’s head (if you’re using the tube provided in the supplies). However, our bug looks upside and we want it to move upwards, so we’re going to rotate it.
14. Image – Free Rotate – 180 degrees – Right – ‘Rotate single layer…’ CHECKED. Your spider should now look like this:
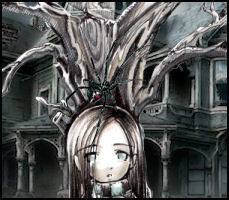
15. Apply same drop shadow settings as we used above for our tube. You can rename this layer as Spider 1.
16. Duplicate this layer and move copy spider a little above the original. Repeat this process, moving the spider a little upwards the tree trunk, until you get to the top. You should have about five spiders/layers of this:

17. Now we want our spider to move to the left. Duplicate spider layer 5, however, go to Images – Free Rotate – 90 degrees – Right – and position immediately after spider 5. Rename this as Spider 6.
18. Repeat this process – duplicating this spider, only this time, try to wind the spider around the frame until you get something like this:
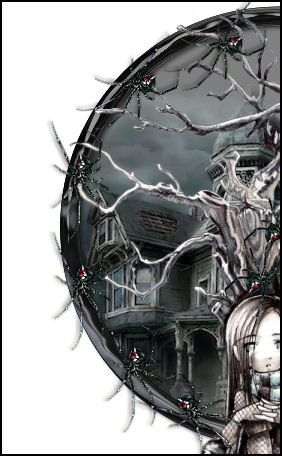
19. The trick to this is always decreasing your degree angle by 10. In other words, if you want your spider to curve a bit more around the circle, keep reducing by 80, by 70, by 60 and by 50. By this time, I have about 12 spider layers – you might have more depending on how small or large your spider is.
20. As soon as you get to the girl, duplicate your last spider layer and this time free rotate and INCREASE by 10. In other words, if you’re at 50 degrees now, change it to 60, so the spider looks like it’s going upwards again. Repeat this process until you get to the very top where your first set of spiders meet:
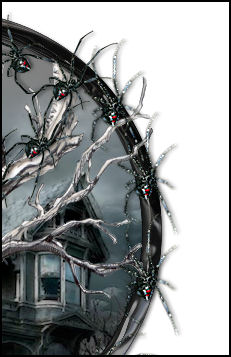
21. By this time, I have a total of 17 spider layers. Now it’s going to get a little tricky – we want the spider to climb DOWN – so you might want to close out the first few layers of spiders we have if you don’t want to get too confused.
22. All done? Great. Back to Spider 17 layer. Make active and duplicate. Free rotate – 180 degrees. Duplicate and rotate again – this time at 90 degrees – continue to do this, making sure your spider is moving DOWN until it hits the top of the girl’s head again:
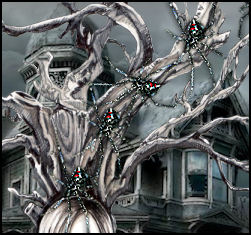
23. When done, I had 21 spider layers. Phew. A lot of layers, but the effects should be cool when we’re all done, eh?
24. Now close out all the spider layers except for the very first one. We’ll get back to this layer.
25. Make your white bkg active. New raster layer. Floodfill with black. Open mask image supplied. On your black layer, go to Layers – New Mask Layer – From Image – Choose mask from drop down menu.
26. Make your dark image layer active (the house). Merge down with your plain gray background layer. Selections – Select All – Float – Defloat. New raster layer – repeat this twice. You should have two raster layers now.
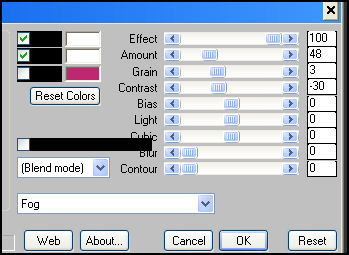
27. On the first ‘blank’ raster layer (still selected!) – go Effects – Plug ins - Mura Meister Cloud with these settings:
28. On your second blank raster layer – effects- plug ins – MM Cloud again, only this time move the ‘Amount’ slider to 21. De-select. Rename these layers fog 1 and fog 2.
29. Go to your topmost layer. Apply your license and copyright information on new raster layer.
30. Choose your text tool. Vector – foreground black, background on white – size 72 – stroke width 2.0. Write out your name or phrase of choice. When satisfied, add a drop shadow of choice. I used the same settings as above.
31. Now make your mask layer active. Text tool – Vector – same font as used above, only this time set your stroke with to 0.0 – size – 22. Write out the word ‘FEAR’ and then convert to raster.
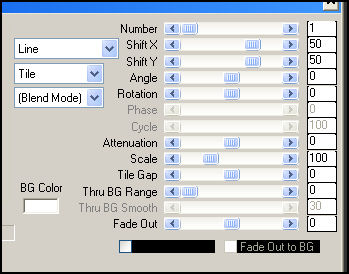
32. Make your mask layer active. Selections – Select All – Float – Defloat – now this is very important…make your text layer active – Effects – Mura Meister Copies – Tiling on default settings.
33. You should now have the words ‘FEAR’ all over the place, but we don’t want that.
34. Go to your selections tool – rectangle – feather 0 – and keeping an eye on your mask layer for guidance, carefully cut out the unwanted parts. We only want to keep the words within the former black box/square of the mask. De-select when done. Merge down the words and mask layers together.
35. Phew…now we’re all done with the hard work…or are we? *LOL*
ANIMATION TIME!
36. Patience, we’re almost done with this puppy. Now, we should have most of the layers closed out EXCEPT: White background, mask layer, original house image, circle frame, tube layer, Spider Layer 1, Text layer(s). Right click on image and copy merged.
37. Open Animation Shop – if it isn’t open already and copy and paste as new animation.
38. Back to PSP. Open up fog 1. Close out Spider 1 and open Spider 2. Copy merged and paste as after current animation in AS.
39. Back to PSP. Close out fog 1. Open fog 2. Close out Spider 2. Open Spider 3. Copy merged and paste as after current frame in AS.
40. Back to PSP. Close out fog 2. Open fog 1. Close out Spider 3. Open Spider 4. Copy merged and paste after current frame in AS.
41. See the pattern now? The only thing you want to be careful about is the fog – we want to keep switching back and forth between the two.
42. When done, you should have a total of 21 frames in Animation Shop – or more (or less) depending on how many spiders you have.
43. When done, select all – animation – frame properties and set to 60. View – animation and you’re all set!
44. Hope you enjoyed the tutorial and don’t hesitate to email me if you’re stuck anywhere or just want to show off your result.
Please no hotlinking the images! Neither can you use the tags created for your personal use or on blogs or websites without written permission. This tutorial is registered with TWI.
© KiyaSama - all rights preserved. Tutorial Written 7th June, 2009.
Tutorials Home
|
|