
FORE!

SUPPLIES NEEDED:
A tube of choice – I’m using one from Keith Garvey. You must purchase or have a GARVEY license to use them.
Plug-ins - Mura Meister Copies - HERE
Mask by Weescotslass
Background Image/Golf Ball tube/Word Art by Me - SUPPLIES
Fonts of choice or – FB Boutique
Jasc Animation Shop 3
REMEMBER TO SAVE OFTEN!
1. Open new image – 650x550 – transparent UNCHECKED – color white.
2. Copy and paste golf ball as new layer. Resize by 80%.
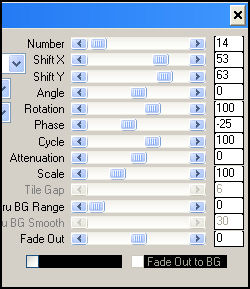
3. Effects – Plug ins – Mura Meister Copies with these settings:
4. Choose your magic wand and click inside the ‘frame’ – selections – modify – expand by 10.
5. Copy and paste your background golf image as new layer. Position/adjust to get as much of the main pictures within the circle. Once satisfied, selections, invert, delete. Move this layer beneath the frame layer. Deselect.
6. Make your background layer active. New raster layer. Choose your tube option and select the grass. Resize scale by 30.
7. Apply tube right below the ‘frame’ so you get something like my tag.
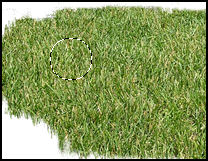
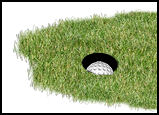
8. Keeping your grass layer active, use your selection tool – circle option – and draw out a small circle on your grass like so:
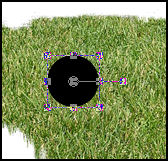
9. Keep selected – new raster layer – flood fill with black. Deselect.
10. Choose your pick tool and you should have something like this around your black circle:
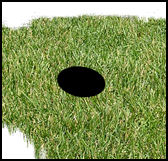
11. Hold down your shift key and begin to pull down the corners in such a way that your circle seems to be flat or horizontal in line with the grass. You should have something like this when done:
12. Copy and paste your tube as a new layer and position as you see on my tag. Apply same drop shadow as you did for the ‘frame.’
13. Copy and paste the golf ball as new layer. Resize by 30%. Position ball right next to tube’s foot.
14. Now duplicate the ball several times – each time moving it a little to the left, so you end up with something like this:

15. I ended up with 20 layers/duplicates, you can rename them ball 1, ball 2 etc. However, we want to give the illusion that the ball is falling into the hole. Duplicate your last golf ball layer again, and then close out the rest, so you can see what you’re doing.
16. Position ball over the hole, and using your freehand selection tool (point-to-point), or you can use your eraser tool, erase the lower portion of the ball, so only the top is visible. You should end up with something like this:
17. Go back to your ball ‘frame’ duplicate this layer twice – rename frame 1, frame 2, and frame 3.
18. Leave frame 1 as is. Make frame 2 active. Adjust – Hue/Saturation – Colorize to fit your tube color or go with H=232 and S=226.
19. Image – Free Rotate – Right by 5 degrees – single layer checked.
20. Make frame 3 active – Image – Free Rotate – Left by 5 degrees – single layer checked. Close out frame 2 and frame 3 layers.
21. Make your background layer active. New raster layer. Flood fill with light color from your tube or tag and apply your mask of choice.
22. Copy and paste the word art as seen on tag (or you can write something else if you want.)
23. On a new layer, add your copyright license and tag information.
24. Choose your text tool, and write out your name – add light drop shadow of choice.
TIME TO GET ANIMATED!
25. Close out all the ball layers except for the very first one (ball 1). Copy merged and go to AS.
26. Paste as new animation and go back to PSP.
27. Close out Ball 1 and Frame 1 layers and open up Ball 2 and Frame 2 layers. Copy merged and go back to AS.
28. Edit – Paste – After current frame. Back to PSP.
29. Close out Ball 2 and Frame 2 layers. Open up Ball 3 and Frame 3 layers. Copy merged and go back to AS.
30. Edit – Paste – After current frame. Back to PSP.
31. By now you should get an idea of how the pattern goes. Since there are only three ‘frames’, you’ll have to keep going back to the frame 1, then 2, then 3 like so with each new ball frame layer you open. Hopefully that made sense.
32. By the time you’re through, you should have at least 20 frames (or less – again this depends on how many duplicate ball layers you had)
33. Edit – Select All. View – Animation and voila! You’re all set!
34. I hope you enjoyed the tutorial!
Please no hotlinking the images! Neither can you use the tags created for your personal use or on blogs or websites without written permission. This tutorial is registered with TWI.
© KiyaSama - all rights preserved. Tutorial Written 4th July, 2009.
Tutorials Home
|
|