
CUPID'S GARDEN

SUPPLIES NEEDED:
Paint Shop Pro Vers. 9+
Animation Shop 3
Animated Tubes from the Cupid’s Garden Pack 2 available at Designs by Kiya
(or tube of choice)
You must have a license to use it.
Kit - Sweet Fantasy by Bella Caribena
You are also welcome to use a kit of your choice that fits the theme.
Masks of Choice
Font – West End and Wallington Pro (or font of choice)
Plugins:
Alien Eye Candy 5 (the latest version is 7 though and site allows free trials)
SUPPLIES (word art)
REMEMBER TO SAVE OFTEN!
1. Open up new image 800 x 800 white background.
2. From your kit, open Element 125 (the waterfall). Resize to 55% and position (see sample tag). Mirror image and then sharpen.
3. Open the psd Cupid tubes (boy and girl) files. Highlight any layer from each. Right click, copy, and then paste as new layer on your tag. Resize to 28% (boy) and 25% (girl) and position as seen on tag sample above. (we are just using these as placement holders for now). Rename each ‘Cupid-Girl’ and ‘Cupid-Boy’ so we don’t get confused.
4. Now open the psd tree animation tube from the pack. Repeat same step in 2 and position as seen in sample tag. Resize tree to 45%. (it will be a placeholder as well). Rename this ‘Tree’ layer.
5. Open Element 130. Mirror and resize (45%) and place beneath Cupid Girl.
6. Open Element 69. Position beneath Cupid Boy. Mirror and resize to 35%. Sharpen.
7. Repeat this for all the other elements you notice in the tag (or use your own!). The key thing we want to keep is the waterfall in the middle.
8. For the ‘flowers in the tree’, I used the elements 83 and 84. The kit has a lot of lovely flowers, so you can use whichever you want. Resize to about 22% and position as seen in tag. Merge all the flower layers together when done. Do NOT merge with the tree layer!
9. Now my elements look a little ‘lifeless’, so to give them a bit more depth, I am going to duplicate some of them and then change the copy layer to ‘Soft Light’ Blend Mode (default settings). So, I did this for the waterfall, rocks, flowers.
10. Now apply drop shadow to all your elements except for the waterfall, cupids, and tree layers.
11. Merge your layers except for the layers mentioned in Step 10.
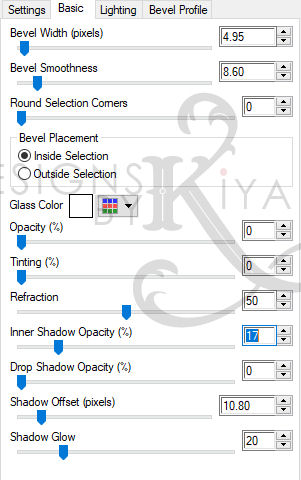
12. Add word art provided. I used the filter Eye Candy 5 – Impact – Glass. Under the ‘Settings’ tab pick ‘Clear, no drop shadow’ and then under the basic tab, use the settings below:
Add drop shadow of choice to word art. (only instead of the black color I used white)
12. For masks, I used the ones that came in the kit – Elements 24, 23 and 2. Merge all mask layers together.
13. Now add your copyright information.
14. You can choose to write your name text now as well.
ANIMATION TIME!
1. Open your Cupids and Tree animations in AS.
2. Starting with our Cupid-Boy, go to Edit – Select All. File – Export Frames – To Paint Shop Pro. All 10 frames should now be in PSP.
3. Resize the entire image to the size of the tube on your tag now. Remember what percentage we resized it to? 28%. Sharpen each layer. Now, to give the tube more ‘depth’, you will have to duplicate each layer, change the copy layer to ‘Soft Light’ Blend Mode’ and then merge.
4. When done, click on the ‘X’ as if to close out the image. You will get a box that pops up asking if you want to save the changes to image, say ‘no’, then it asks if you want to update in AS. Say ‘yes’. You should now see the changes reflected in AS. Reduce the window and move to the next tube.
5. Repeat Steps 3 and 4 for the Cupid-Girl and Tree tubes. However, for the tree, we are going to add a drop shadow as well.
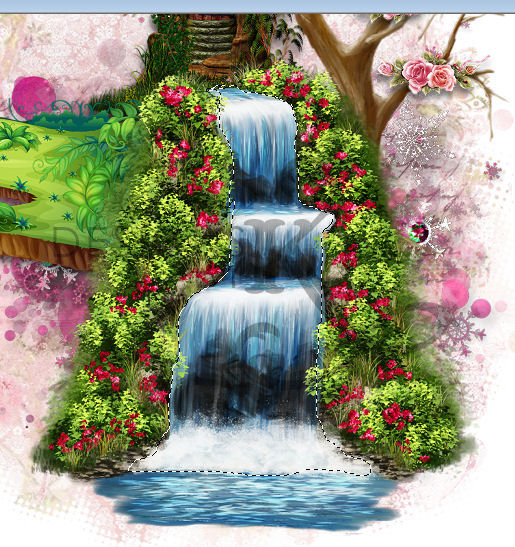
6. Go back to PSP. Open up your tag. Make the ‘waterfall’ layer active. Using the freehand selection tool with these settings:

Draw around the water like so:
7. With the matching ants still around it, duplicate the waterfall layer until you have 5 of them. Make the original waterfall layer active. Click on Adjust – Add Noise – and use the settings below:
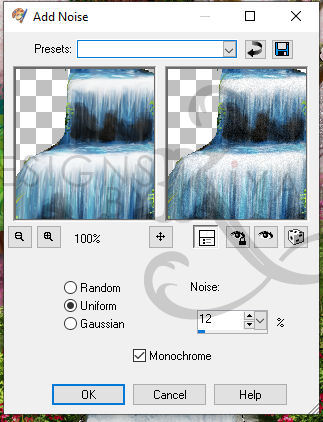
8. Make the next waterfall layer active. Using the same settings, only this time, change the noise setting to 16. Repeat for the other layers, increasing by 2 or 4 each time. Rename these ‘waterfall1’, ‘waterfall2’ etc.
9. Now, close out ALL the layers except for your background and masks layers. Right click, copy, and then paste as new animation in AS.
10. Edit – Duplicate Selected. Repeat this until you have 10 frames in all. Note! Make sure you only have one frame highlighted as you duplicate, because if you don’t, AS just duplicates every frame that you have so far.
11. Keep all 10 frames selected. Now open up your tree animation. Make sure all 10 frames are selected as well. Making sure you’re on the first frame, drag and drop the tree animation unto your tag. Try to position it as close as where it was in your original tag in PSP.
12. Now back in PSP, close out the background, masks, non-animated tree layer, cupid (boy and girl), all layers ABOVE the cupids, and four copies of your waterfall - leaving only ‘waterfall 1’ active.
13. Right click on your tag and copy merge this whole to AS. Paste as NEW ANIMATION. (It should not be on the background and tree tag just yet!)
14. Go back to PSP, Close out ‘waterfall 1’ layer. Make ‘waterfall 2’ active. Repeat, only this time paste ‘AFTER CURRENT FRAME’. Do this until you have five frames of the waterfall/elements.
15. Now go back to your first frame. Edit. Select All. Edit again. Duplicate Selected. You should now have 10 frames. Making sure you’re on the first frame, drag and drop this onto your mask/background tag. Reposition so it fits like your original tag.
16. Now go to Edit – Export Frames – To Paint Shop Pro. Your 2nd version of the tag should now be in PSP. Try not to get too confused! *lol* We simply want to now paint in shadows for our cupids so they don’t look too flat with the rest of the tag.
17. You can copy and paste your cupids onto the animation tag just to make sure you are painting the correct area. Once you’ve repositioned the tubes, create a new layer beneath them. Set your paint brush to this setting:

18. Once satisfied, delete the cupids and you should only be left with the shadows like so:
19. Now you have to duplicate the shadow layer 10 times and then merge with each frame/layer. When complete transfer back to AS.
20. Now time to transfer our cupids! In AS, repeat the same drag and drop process, making sure you position them within their shadows. Do not forget to mirror the boy cupid. To do that, go to the ‘Animation’ tab and click on ‘Mirror’.
21. Back in PSP, close out all the layers except for the ones above the cupid tubes (that should be the butterflies, or other smaller elements, name, and your copyright info. Copy merged and paste as new animation in AS. Duplicate the frames until you have 10 of them and then drag and drop onto your tag to complete the scene.
22. Set animation frame properties to 20. Save as gif file with default settings and you’re all set!
Hope you enjoyed the tutorial!
There's no limit to where your imagination and creativity can take you, so use whatever you've learned here and explore all possibilities! :D
Please no hotlinking the images! Neither can you use the tags created for your personal use or on blogs or websites without written permission. This tutorial is registered with TWI.
© KiyaSama - all rights preserved. Tutorial Written 6th April, 2009.
Tutorials Home
|
|