
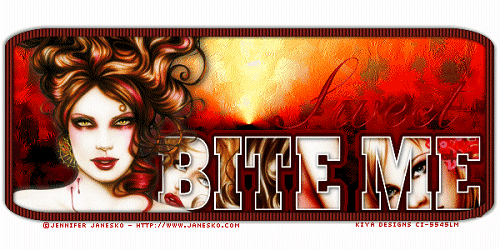
BITE ME
SUPPLIES NEEDED:
[You Must Have Working Knowledge of PSP!]
Paint Shop Pro Vers. 9+
Animation Shop 3
Your tube(s) of choice. Tube(s) used for this particular tutorial is by Jennifer Janesko. You must have a CDO license to use it.
Plug ins
Vanderlee’s Unplugged X 2.0 - Light- Get HERE
Eye Candy 4000 (Glow)
Fonts of Choice or Rockwell Bold Extra and Old Script
REMEMBER TO SAVE OFTEN!
1. Open up new image – 650 x 300 – white background.
2. Set foreground color to black and background color to null.
3. Make preset shapes active and select the ‘rounded rectangle’ shape with width settings at 10.
4. Draw out rectangle shape in middle of canvas. Go to ‘Objects’ – ‘Align’ – ‘Center in Canvas’. Convert to raster.
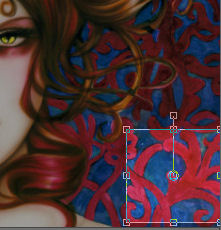
5. Open up IMAGE of tube and crop out background pattern like so:
6. Make magic wand active – feather ‘0’ – and click inside rectangle. Selections – Modify – Expand by 3.
7. Create new raster layer. Set foreground to patterns and choose the cropped out section of your image from the options there. Angle (0) Scale (100). Flood fill new layer with the pattern. Move below black frame.
8. Keep selected. Go to Effects – Art Media Effects – Brush Stokes on default settings.
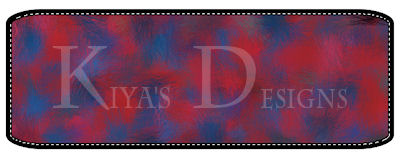
9. You should have something like this when done:
10. Keep selected. Copy and paste tube as new layer. Move to left (or right) side of your tag. Resize if needed. Selections – Modify – Invert – Delete to remove excess. Selections – Select None – move tube layer beneath frame.
11. Duplicate tube. On copy layer – Gaussian blur (4) – Click on layer and choose soft light. Merge both layers together. Add drop shadow of choice.
12. Make artistic brush layer active. Set your foreground color to white, and background color to null.
13. Make text tool active, and using text of choice (or Rockwell Extra Bold) with stroke width at 2, write out the words ‘BITE ME’. Convert to raster.
14. Magic wand – click inside each letter – (you can either hold down the shift key while clicking or set to mode to ‘Add(Shift)’ ) Selections – Modify – Expand by 1.
15. Keep selected. Copy and paste any other tubes you might have (of the same artist!) within the letters. Arrange them however you want, but we want them to fill the space as much as possible.
16. When done pasting, hit the delete key on each tube layer. Selections – Select None. Merge the tube layers together and move beneath ‘word frame’. Apply drop shadow of choice to this ‘word frame’ twice. Merge both layers.
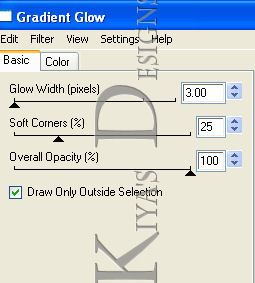
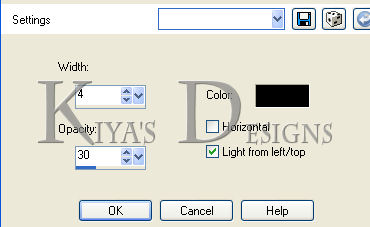
17. Effects – Eye Candy 4000 – Glow – set color to black with these settings:
Repeat this again, and then set color to red (or whatever color is predominant in your tube) and repeat the process.
18. Make black frame layer active. Selections – Select All – Float – Defloat – Flood fill with dark color from your tube (in my case red). Go to Effects – Textures – Blinds – these settings
19. Add drop shadow of choice. Select None. Add whatever extra text you want on the tag. Add copyright license information and now we’re reading to animate!
ANIMATION TIME:
1. Open up your animation shop.
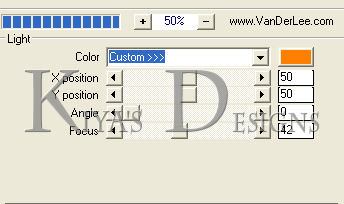
2. Back in PSP, make sure the artistic brush layer is active. Selections – Select All – Float – Defloat. Effects – Plugins – Vanderlee – Unplugged X 2.0 – Light - with these settings:
3. Apply and then ‘copy merged’.
4. Go to animation shop and paste as new animation.
5. Back to PSP. Edit – Undo – and repeat the effects, only this time, you’re moving the ‘Angle’ slider a little more to the right. In this case, the number should be ‘63’
6. Go back to animation shop and paste after current frame.
7. Repeat steps 5 and 6. You should have about six frames when you’re done (or smaller depending on how many times you moved the slider).
8. View – view animation and see how it looks. If you’re satisfied with the speed, then you’re all set!
9. Hope you had fun with the tutorial, and I’d love to see your results or variations of this.

Please no hotlinking the images! Neither can you use the tags created for your personal use or on blogs or websites without written permission. This tutorial is registered with TWI.
© KiyaSama - all rights preserved. Tutorial Written 7th October, 2010.
Tutorials Home
|
|