
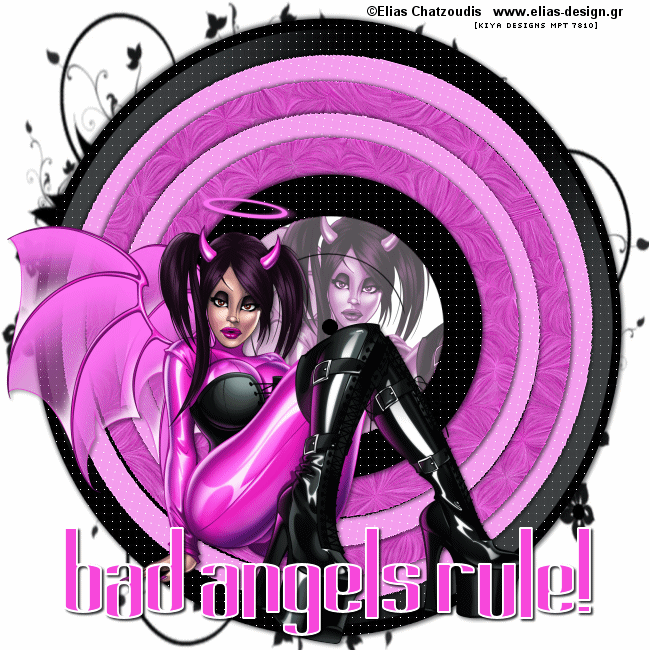
BAD ANGELS RULE!
SUPPLIES NEEDED
Tube of choice – I’m using one from Elias Chatzoudis. You must have an ELIAS license to use it.
Template #6 by Seachellz Scrapz – Download it from her page Here
Plugins - Eye Candy 5 - Texture - Download DEMO
Mask - Right click and save image - HERE
Fonts of Choice or Long Cool Grandma
Animation Shop 3
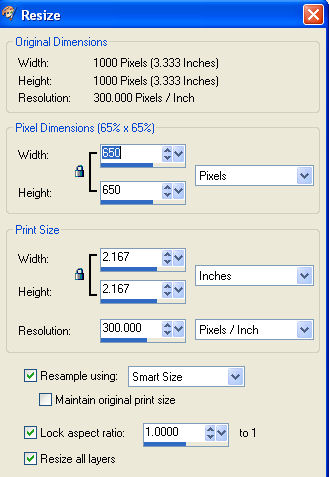
1. Open template. Resize using these settings:
2. Select light color, using dropper tool, from your tube – I’m using #f145d5 – and set in foreground.
3. On template, make Layer 4 active. Click within first innermost circle (before black one). Selections – Modify – Expand by 2. Add new raster layer and flood fill with light color.
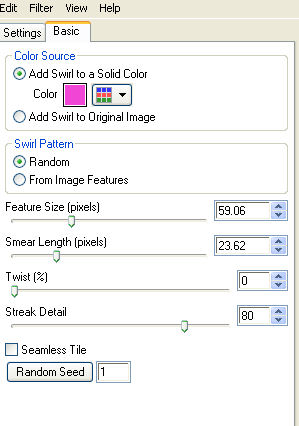
4. Effects – Plug ins – Eye Candy 5 Textures – Swirl – using these settings. Make sure you set the color to the same light hue you used for your flood fill.
5. Once applied, de-select, rename this layer as ‘Circle 1’ and go back to Layer 4.
6. Click the next section of the inner circles. Add new raster layer. Choose a lighter color from your tube – I’m using #f59eee - and flood fill new layer with this hue.
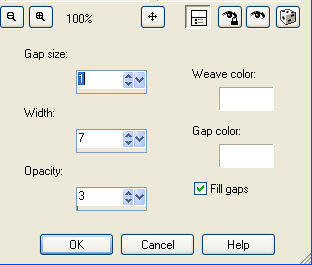
7. Effects – Textures – Weave – these settings:
8. Once done, de-select, rename this layer ‘Circle 2’ and make Layer 4 active again. Repeat steps 3 and 4 – remembering to click the next outermost circle after the weave layer. Rename this layer ‘Circle 3’.
9. Repeat steps 5 – 7 with the next outermost circle. Rename layer ‘Circle 4’. When done, delete Layer 4.
10. Make Layer 1 active and apply the same weave settings as we used above. Make Layer 6 active and apply same weave settings.
11. Make Layer 2 active and lower opacity to about 50%.
12. Make Layer 8 active. Copy and paste tube on image, making sure you get most of the face – resize if needed. Selections – Invert – Delete. De-select.
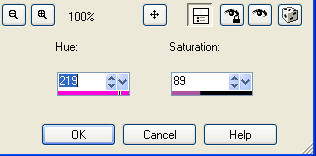
13. Still on your tube layer – adjust – hue and saturation and look for the hue that’s closest to the colors used for your circles or go with my settings below:
14. Lower opacity to about 70%.
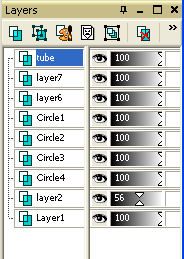
15. Merge down beginning with Layer 10 until you get to Layer 7. Delete the ‘excess’ layers – Layers 3 and 5. When done, you should have something similar to this:
16. Copy and paste your tube as the topmost layer. Apply drop shadow of choice. I’m using the settings – 2, 2, 50, 5.
17. Make Layer 1 active. Apply drop shadow – 2,2, 50, 5. Repeat shadow settings only this time make V & H -2, -2.
18. Repeat step 7 for your other circle layers.
19. Create new raster layer – move to the very bottom of the all the other layers. Floodfill with white.
20. Create another new raster above the white bkg. Flood fill with black.
21. Open your mask as new image. Layers – New Mask Layer – From Image – choose mask from drop down menu – apply. It’s going to be pretty tough to see, so move the mask a little below and to the right of the tag. Duplicate – Mirror - Flip – move to the top and left carefully. Merge these two mask layers together.
22. Click on current top layer and create new raster layer – add your copyright/license info.
23. Using your font of choice, write out your name or phrase of choice. I used the font ‘Long Cool Grandma’ – Vector – foreground (white), background (light color from tube) – width stroke (2.0). Convert to raster and apply drop shadow of choice.
ANIMATION TIME:
[Hopefully this won’t be too confusing, but here goes!]
24. Copy merged all layers – go to AS and paste as new animation.
25. Back to PSP, ‘X’ out Circle 2, 3, 4. Copy merged and paste ‘after current frame’ in AS.
26. Back to PSP, Un-X all circle layers. Copy merged and paste ‘after current frame’ in AS.
27. Back to PSP, ‘X’ out Circle 1, 3, 4. Copy merged and paste ‘after current frame’ in AS.
28. Back to PSP, Un-X all circle layers. Copy merged and paste ‘after current frame’ in AS.
29. Back to PSP, ‘X’ out Circle 1, 2, 4. Copy merged and paste ‘after current frame’ in AS.
30. Back to PSP, Un-X all circle layers. Copy merged and paste ‘after current frame’ in AS.
31. Back to PSP, ‘X’ out Circle 1, 2, 3. Copy merged and paste ‘after current frame’ in AS.
32. When done, you should have a total of 8 layers in AS.
33. Edit – Select all – Animation – Frame properties – set to 50. View – Animation and check it out.
34. If you’re satisfied with what you see, save as a .gif file and you’re all set!
35. Thanks for trying the tutorial and I hope you enjoyed making the tag!
Please no hotlinking the images! Neither can you use the tags created for your personal use or on blogs or websites without written permission. This tutorial is registered with TWI.
© KiyaSama - all rights preserved. Tutorial Written 12th May, 2009.
Tutorials Home
|
|