
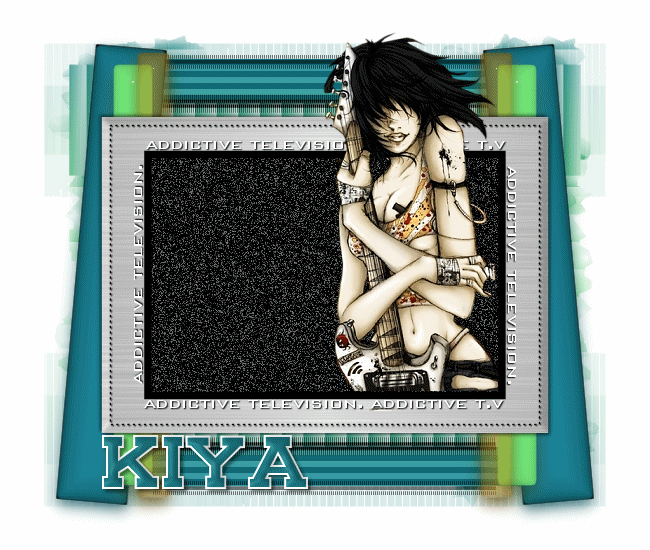
VIDEO KILLED THE RADIO
SUPPLIES NEEDED
Tube of choice (preferably half-body) – I am not sure of the artist of this particular tube, so if anyone knows the artist, please let me know and credit will be given.
Template #26 by Babe's Designz – Check out her site Here
Plugins - Eye Candy 5 - Impact - Download DEMO
Plugins - VM Extravaganza - Download HERE
Mask by Weescotlass – Download SUPPLIES
Fonts of Choice or Bank Gothic MD and Carnasie Slab
Animation Shop 3
1. Open template. Select and delete top layer with copyright information.
2. Click on ‘Bars 1’ layer. Selections – Select All – Float – Defloat. New raster layer.
3. Effects – Plug ins – Eye Candy 5 Impact – Glass – Opaque black with reflection. Go with default settings. OK. Delete ‘Bars 1’ layer.
4. Click on ‘Bars 2’ layer. Selections – Select All – Float – Defloat. New raster layer.
5. Effects – Plug ins – Eye Candy 5 Impact – Glass – Green – Default settings. OK. Delete ‘Bars 2’ layer.
6. Click on ‘Bars 3’ layer. Selections – Select All – Float – Defloat. New raster layer.
7. Effects – Plug ins – Eye Candy 5 Impact – Glass – Jade – Default settings. OK. Delete ‘Bars 3’ layer.
8. Click on layer ‘1’ . Effects – Plug ins – Eye Candy 5 Impact – Brushed Metal – Linear Steel – Default settings. OK.
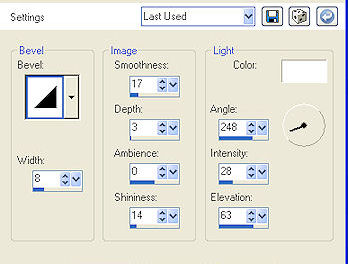
9. Effects – 3-D effects – Inner Bevel at these settings:
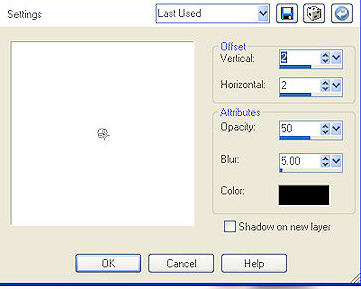
10. Add drop shadow with these settings:
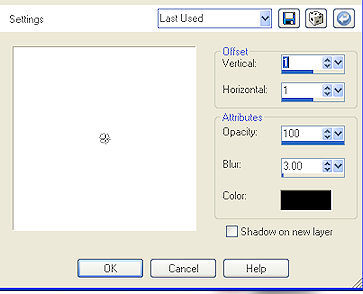
11. Apply the drop shadow to ‘dot frame’ layer with these settings:
12. Magic wand – click inside layer ‘3’ – selections – invert – go to layer ‘2’ – delete. De-select.
13. Make layer ‘3’ active – magic wand – click. Selections – modify – expand by 3. Add new raster layer. Floodfill with black. Delete layer ‘2’.
14. Move this layer beneath layer ‘3’. Duplicate black layer twice (for a total of three layers). Rename each layer – Black 1, Black 2, Black 3.
15. On ‘Black 1’ – go to Adjust – Add/Remove Noise – with these settings:
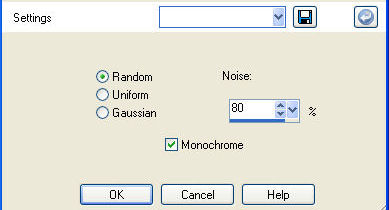
16. On ‘Black 2’ – repeat add noise but change noise to 90. On ‘Black 3’ – repeat add noise but change noise to 100.
17. Using your dropper tool, pick out the colors from your ‘Jade’ and ‘Green’ bars. Make the ‘Jade’ your foreground color and ‘green’ the background color.
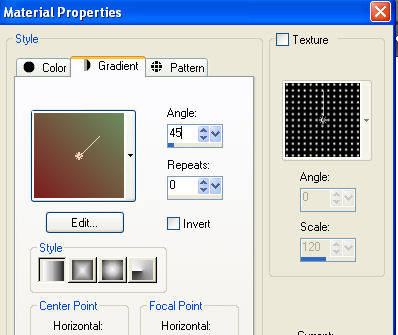
18. Go to gradients and choose the foreground-background gradient with these settings:
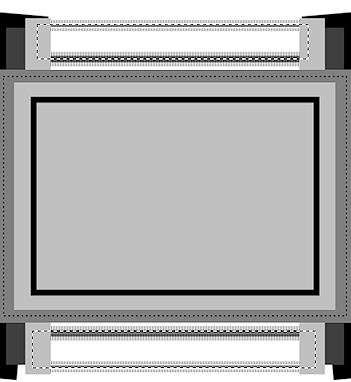
19. Make the ‘transmission bars’ layer active. Using your selection tool – rectangle – add(shift) – feather (0) – draw a rectangle at the top. Hold your shift key and draw another rectangle at the bottom. It should look a little something like this:
20. New raster layer. Floodfill with your gradient color. Move this layer beneath the ‘transmission bars’ layer. Do not de-select yet!
21. Duplicate this layer twice for a total of three layers. Rename Bar 1, Bar 2, Bar 3.
22. On Bar 1, Effects – Plug ins – VM Extravaganza – Transmission – with these settings: Line width (7), Offset (0), Contrast (40). Apply.
23. On Bar 2, repeat effects, but change offset to 24. On Bar 3, repeat effects, but change offset to 45. Now you can de-select.
24. With foreground color set to black, make layer ‘3’ active. Preset shapes - rectangle on these settings:

25. Draw a rectangle around the frame. Objects – align – center in canvas.
26. Set your background color to white. Fonts – choose a font of your choice (I’m using Bank Gothic MD BT) – size 22 – stroke width 0 – floating – alignment center – position your mouse at the top of the vector line until you see the A) sign – begin to type whatever phrase you’d like to use. I’m using ‘Addicted to T.V’. Once your words have surrounded your frame, de-select to get rid of the matching ants. Delete the vector layer. Add drop shadow to the promoted selection (your phrase layer) – with settings 1, 1, 100, 2.
27. Open your tube. Copy and paste as new layer on your tag. Resize as needed (mine was by 60%) – duplicate. Move copy beneath layer ‘3’ and move the original to the topmost layer. Make layer ‘3’ active. Click and expand by 15. Selections – Invert- (and making sure tube copy layer is active) – Delete. De-select.
28. Go to top most tube layer and using your eraser tool, erase the lower portions of the tube, so it would seem as if the tube is coming out from the T.V. Apply drop shadow of choice to ‘bottom copy tube’.
29. Set your foreground color to the jade color from your layer and set background to the green from the other glass layer. Go to gradients and set foreground-background gradients with previous settings above.
30. Make your white background layer active. Create new raster layer and floodfill with gradient.
31. Open up your mask - apply it if you've uploaded it to your masks folder - or simply go to Layer - New Mask Layer - From Image - choose the mask from the drop down menu - apply. Delete mask on your layer palette and ungroup layers.
32. Create new raster layer - add your copyright and license info.
33. Time to add your text! Choose the font Carnasie Slab (or font of choice) - foreground white, background the 'green' from your glass layer. Stroke width (2). Vector. Type out your name. Position as liked and add drop shadow 2,2,50,5.
TIME TO ANIMATE!
'X' out Black 2, Black 3, Bar 2, Bar 3. Copy merged and paste as new animation in AS.
'X' out Black 1 and Black 3, Bar 1, Bar 3. Un 'X' Black 2, Bar 2. Copy merge. Paste after frame in AS.
'X' out Black 1, Black 2, Bar 1, Bar 2. Un 'X, Black 3, Bar 3. Copy merge. Paste after frame in AS.
34. You should now have three frames in Animation Shop. Edit - Select All - View - View Animation. Like how it looks? Great! Save as .gif file and you're all set!
35. Thanks for trying the tutorial and I hope you enjoyed making the tag!
Please no hotlinking the images! Neither can you use the tags created for your personal use or on blogs or websites without written permission. This tutorial is registered with TWI.
© KiyaSama - all rights preserved. Tutorial Written 11th May, 2009.
Tutorials Home
|
|