
SUPERSTAR!
SUPPLIES NEEDED:
Two tubes of choice – I’m using ones from Rion Vernon [PinUp Toons]. You must purchase or have a
CDO license to use them.
Plugins - Penta.com Jeans and Mura Meister's Copies
Fonts of choice or – Marquee and Beads
Mask/Font - SUPPLIES
[Optional] - Scrap kit elements of choice
Jasc Animation Shop 3
REMEMBER TO SAVE OFTEN!
1. Open new image 650x550 – transparent UNCHECKED – color white.
2. Select a dark color from your tube. Click on the ‘swap materials’ arrow button to move this to your background color. Set foreground color to null.
3. Choose your rectangle preset tool. Draw out a rectangle about 500x60 in size. Look at the numbers at the bottom of your workspace to make sure you’re at the right numbers.
4. Objects – Align – Center in Canvas. And move it upwards a little bit – we don’t actually want it in the center of the tag. Convert to raster. Duplicate and flip. Merge these two layers together.
5. On your materials palette, click on the ‘swap materials’ arrow button – your background will now be set to null and your foreground with whatever dark color you chose.
6. Choose the ellipse tool – width to 30. Draw out a circle right above your white background layer. Objects – Align – Center in Canvas. Convert to raster.
7. Choose a light color from your tube – (#fde7d8). With your magic wand, click inside the circle. Selections – Modify – Expand by 5. New raster layer and flood fill this layer with your light color. Move this layer beneath your circle frame. Selections – Select None.
8. Make your ‘bars’ layer active. Go to Effects – Texture Effects – Blinds – with these settings:
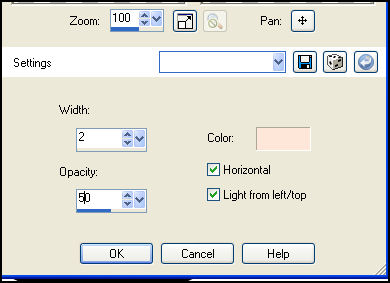
9. Note that color used is the same light color from your tube. Apply light drop shadow to this layer – 2,2,50,5. Repeat drop shadow, only this time, change H and V to -2 (negative 2)
10. Make your circle layer active. Set foreground color to the same light color you chose from your tube. Go to your ellipse tool – change line style to DIAMONDS – width 5. Draw out a circle just big enough to fit inside the other one (see my tag for reference). When you’re satisfied with how it looks – objects – align – center in canvas and then convert to raster.
11. Make your plain color layer (the circle) active. Selections – Select All – Float – Defloat – Effects – Penta – Jeans – Amount (19) – Border Width (7). Apply. Do not deselect yet!
12. Copy and paste your tube of choice as a new layer. Resize(if needed) just so it fits between the two bars (see tag for reference). Selections – Invert – Delete. With your eraser tool, erase any part of the tube sticking out from beneath or above the bars.
13. Keep this layer active. Effects – Mura Meister Copies – with these settings:
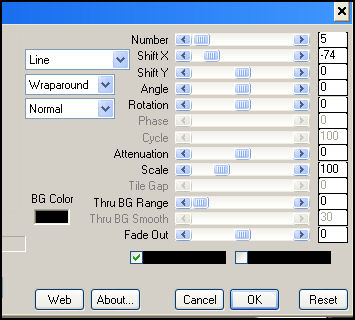
14. With your eraser tool, delete the excess copies sticking out from the edges. Make your circle frame layer active. Apply the same drop shadow settings we’ve been using.
15. Make your white background layer active. Flood fill with black (or a dark color from your tube). Apply your mask of choice or open the one provided in the supplies – Layers – New Mask Layer – From Image. Select mask from drop down menu – source luminance and invert mask data CHECKED. Delete and ungroup layers.
16. Make your topmost layer active. Copy and paste your tube as a new layer and position as you see on my tag. Apply light drop shadow of choice.
17. You can choose to add scrap elements to this (as my second tag below shows).
18. On a new raster layer, add your copyright and license information.
19. Choose your text tool. Vector – Marquee – size (150) – stroke width (2) – foreground color (light color from tube), background color black (or dark color from tube). Convert to raster layer.
20. We are now done with one part of this tag *lol*
ANIMATION TIME!
21. In Animation Shop, go to File – Banner Wizard. In the first window that pops up, make sure ‘transparent background’ is checked. Click on Next.
22. Make sure ‘use standard banner size (480x60)’ is checked. Click on Next.
23. For the next questions, leave as is (10 should be the numbers in the box) and make sure ‘yes, repeat animation indefinitely’ is checked. Click on Next.
24. You should have a box telling you to type in the font, click on the ‘Set Font’ button and a font dialogue box will pop up. Select the ‘BEAD CHAIN’ from your font list. Style – Regular, Script – Western, Size – 28. Anti-alias checked and ‘center’ alignment checked. Click on OK.
25. You’ll be taken back to your previous dialogue box. Click on Next.
26. Make sure the ‘opaque’ is checked and left click on the color box. Type in the hex code of the light color you used for your tag. Apply. Click on Next.
27. You will now see a preview of what your marquee text would look like. Click on customize and check the ‘center text vertically option’. Apply.
28. Seems a bit too fast though, so let’s go back to the box that asked for how long you’d like the animation to last (the first option). Do this by clicking on the back button until that particular box shows up again. Type in 20 instead. Click on next until you get to the preview page again. It should be going a little slower now. Click on finish and you should now have 20 frames of your marquee text. Edit – Select All.
29. Go back to PSP. Make your white background layer active. Close out your text/license/copyright layer and your main tube layer. Right click on your tag. Copy merged and paste as new animation in AS.
30. Holding down your Ctrl key, press the L button 19 times for a total of 20 frames. Edit – Select All.
31. Now go to the first frame of your marquee – make sure you’re in the first frame. You’ll notice that only the letter S and half of U is visible. DRAG this to the first frame of your tag and position on the top bar at the RIGHTMOST portion of it. In other words, your half U should be right next to the edge of the bar. Got that? Great! Release the mouse and everything falls into place.
32. Go back to your marquee text – looks empty now, but we want to use it again, so go to ‘Edit’ and ‘Undo Drag’.
33. Make sure all frames are selected. Go to Animation – Reverse frames. Now, you’ll see that the very first frame has a half A and an R.
34. Using the same drag and drop method, drag this to the bottom bar in your tag, only this time, we want our half A close to the LEFTMOST edge of the bar (not all the way to the edge like the top one!) Release your mouse. Got it? Fabulous!
35. View- Animation and check out the effects! Not done yet though, let’s not forget the other part of your tag *lol*
36. Back in PSP, close out all the other layers and open up your main tube, text/license layer. Copy merged and paste as new animation in AS. Duplicate the frames for a total of 20.
37. Using the same drag and drop method, position your tube and text as it is in your PSP workspace.
38. And voila! You’re all set! Hope you enjoyed the tutorial!
Below is another tag with the same design - have fun with it! ^_^
Please no hotlinking the images! Neither can you use the tags created for your personal use or on blogs or websites without written permission. This tutorial is registered with TWI.
© KiyaSama - all rights preserved. Tutorial Written 15th June, 2009.
Tutorials Home
|
|