
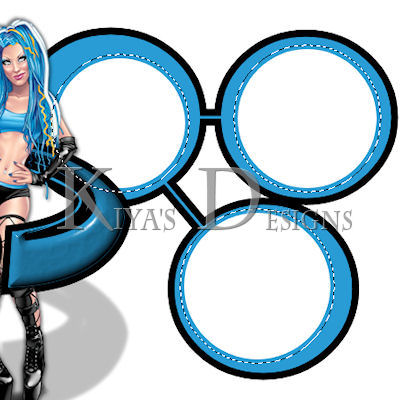
STAR FIGHTER
SUPPLIES NEEDED:
[You Must Have Working Knowledge of PSP!]
Paint Shop Pro Vers. 9+
Animation Shop 3
Your tube of choice. Tube(s) used for this particular tutorial is by Elias Chatzoudis. You must have an ELIAS license to use it.
Plug ins
VM Experimental (The Accountant)
Eye Candy Impact (Bevel)
a suitable noise filter of choice (you can either use DSB Flux (Bright Noise) or Filters Unlimited (Noise filters) or PSP’s adjust –add noise settings – whichever is best for you)
Xenofex 2.0 (Constellation)
Eye Candy 4000 (Glow)
(Go to Liberta Designs to search for appropriate filters)
Mask of choice
Fonts of Choice or Rockwell Bold Extra and Rolinga Renna
SUPPLIES
REMEMBER TO SAVE OFTEN!
1. Open up new image 650 x 500 white background.
2. Open your tube (a full tube will work best for this tag naturally). Paste as new layer – resize if needed (roughly by 80%). Move to left side of canvas – see tag for reference.
3. Load up preset shapes supplied to your PSP Presets folder.
4. Choose two colors from your tube – using the dropper – set background to dark color from your tube, in my case (#2a9cd5 – blue). Set foreground to black.
5. Go to your preset shapes, and pick AOE_a (the shape that goes around the girl’s waist) with these settings:

6. Draw out the shape just enough to go around the girl without looking too big. See tag for reference. When satisfied, convert to raster.
7. Magic wand – click inside the section of the circle that’s white

8. Press delete. Create new raster layer. Fill this section with light color from your tube, for my example I used the yellow (#ffe74c). Select none. Move this layer beneath the shape. Merge shape and yellow section together.
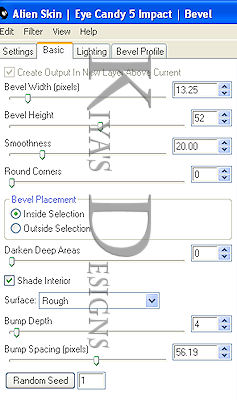
9. Magic wand again. Click inside the shape – you should have ants around the blue – go to Effects – Eye Candy Impact Bevel with these settings (I think it should be the default setting, but if not use these):
10. Select none. Now move shape BELOW your tube – arranging it in such a way that it looks like the girl is standing in the middle. Now duplicate your tube and move this duplicated layer BENEATH the shape. So basically your layer palette should look like: TUBE, SHAPE, TUBE, BKG.
11. Make the top most tube layer active. Using your eraser tool, erase front of girl, so you see the circle. See my tag for reference. Apply drop shadow to your BOTTOM tube (2,2,50,5). Repeat drop shadow only this time make H/V (-2).
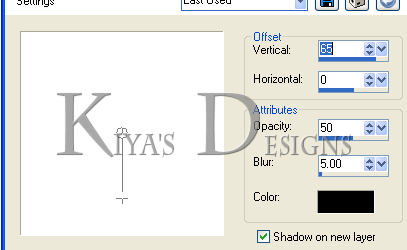
12. Now make your shape layer active. Effects – Drop Shadow with these settings (note that shadow on new layer IS CHECKED).
13. Note on your layer palette that there are now ‘chain links’ next to your shape and drop shadow – this only means that if you try to move the shape, both layers will move together. But we don’t want that to happen. We only want to move the shadow layer. Make shadow layer active and then click on the area highlighted in the image below:
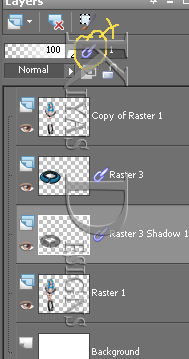
14. Now you’ll notice only the shape has the link. Now move your drop shadow layer lower (see tag for reference). Make sure it’s on the same line as the original shape. Lower opacity to 50.
15. Now, back to our preset shapes, choose AOE_M – same settings as above.(Remember to make foreground color black and background your dark color from tube) Making sure background layer is active, draw out the shape as you see in my tag. Don’t make it toooo large, but just big enough. When satisfied, convert to raster.
16. Go to selections tool – Circle – click inside each of the main circles and delete. It doesn’t have to be perfectly in the center – see below for what I mean:
17. Click inside each circle you’ve just deleted with your magic wand (remember to hold down shift key for multiple sections) – selections – modify – expand by 5. New raster layer. Flood fill with black. Move this layer beneath your shape. Select none.
18. Duplicate your black layer twice for a total of three layers. Now click on the ‘blue’ section of the shape and apply the same bevel settings for the shape around the girl. Select none. Apply drop shadow.
19. Make your original plain black circle layer active. Go to Effects – Xenofex 2.0 – Constellation – Star Field – with these settings.
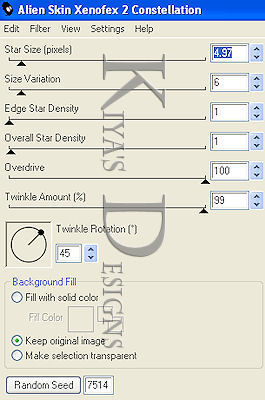
20. Go to the next black layer – same effects but remember to click the random button. Still on this layer, go to Adjust – Hue and Saturation – Colorize – H(147) and S(255) – actually you can set it to any color you want, but if you want the blue, then this works.
21. Repeat the same step above for your last black layer. Colorize to another shade/color of your choice. Have fun with it.
22. I also applied constellation effects to the shape around the girl’s waist – just click on the black outline, duplicate twice and repeat the steps in 20. This is optional of course.
23. Make your background layer active. On your color palette, make sure you have your dark and light colors set, then go to gradient – foreground/background – linear – angle (0) repeats (1).
24. New raster layer – Flood fill with your gradient – open mask supplied – apply. Duplicate your mask layer twice for a total of three. Close out the first two.
25. Make original mask layer active. Selections – Select All – Float – Defloat. Effects – VM Experimental – The Accountant – default settings.
26. Keep selected and repeat the process for the next two layers, only moving around the ‘Input Channel’ slider. Select none.
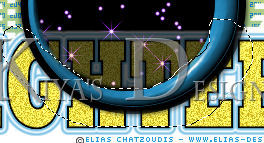
27. Now, you’re more than welcome to use the word art I’ve supplied. Just copy and paste it right above the mask layers.
28. If you want to make your own, then write out your text of choice, making sure foreground is black and background is a light color from your tube – stroke width (2). Use your magic wand and click inside each letter –now use any of your noise filter plugins and apply a noise setting of choice. Deselect. Effects – Eye Candy 400 – Gradient Glow – with blue or dark color of choice with these settings:
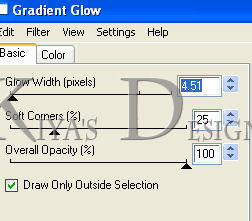
29. Apply. Repeat Glow again. And you’re set.
30. To give the illusion that the text is showing through the last circle, I duplicated the wordart and moved this layer to the very top. Lower the opacity of this layer (34) and then use your eraser tool to erase text that sticks out around here:
31. Add your name in one of the circles (or see my tag for reference) and then add your license or copyright information.
ANIMATION TIME:
1. By now you should have an idea of how the animation sequence goes, if you don’t, please go through previous tutorials that give more detailed explanation.
2. If you’ve got your three main layers in AS set, great! Now open up the animations in the supply. You’ll notice that they have ten frames each...and we only have three for our tag. Easy peasy.
3. Make sure all three frames of our tag are selected – Edit – Copy – Click on the last frame of the tag. Edit – Paste – Paste after current frame. You should now have six layers. Repeat this process. You’ll have nine. Repeat again...you should have 12 - a little more than we need. Just click on Frame 12, press delete on your keyboard. Do the same for frame 11.
4. Click on the first frame of your tag – edit – select all.
5. Open up any of the animations provided – select all frames – making sure you’re on the first frame of say Spaceship01, hold down your mouse and drag the animation into the first frame of our tag. See my tag for positioning. Release mouse and all the layers should drop in easily.
6. Repeat process for Spaceship02. View – view animation and you should be all set!
7. It’s a long one, but hope it’s all worth it when done.
Please no hotlinking the images! Neither can you use the tags created for your personal use or on blogs or websites without written permission. This tutorial is registered with TWI.
© KiyaSama - all rights preserved. Tutorial Written 19th September, 2010.
Tutorials Home
|
|