
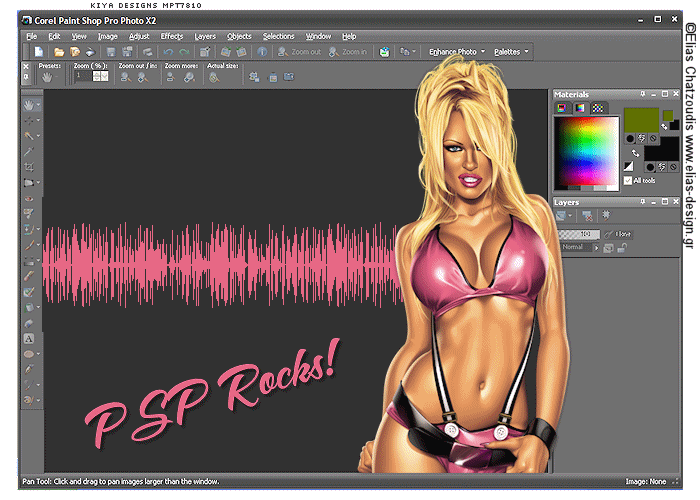
PSP ROCKS
SUPPLIES NEEDED:
Tube of Choice – I’m using a fabulous tube from Elias Chatzoudis. You must purchase or have an ELIAS license to be able to use it.
You’re also welcome to use any other tube of your choice.
Plugins – Filters Unlimited 2.0 – Pattern Generators
You can purchase plugin here
Animation Shop 3
1. Open your PSP program and take a screen shot of it – press the ‘Print Screen’ key on your keyboard and then go to ‘Edit’ and choose ‘Paste as New Image’. Optional - You can use your crop tool to remove the Windows menu bar at the bottom of the screen, so you only get your PSP screen in its entirety.
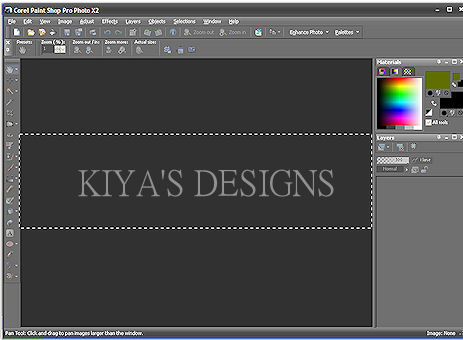
2. Minimize PSP screenshot image and open new transparent image 700x500. Floodfill white. Merge flatten to make it your new background.
3. Copy and paste PSP screenshot image as new layer, resize to 65% and sharpen.
4. Add light dropshadow. I used 0,0, 50, and 5.
5. Choose your tube – a half-cropped one usually works best, but whichever works for you is fine – and paste as new layer. Resize to about 80% and move to the right hand side of the PSP screen – do not cover the materials/palette area.
6. Position tube in such a way that it seems as if it’s coming out of the PSP screen. If you’re using a full body tube, use the selection tool and carefully delete lower section of tube.
7. If happy with your position, add light shadow – use the same one above.
8. Select your PSP screen shot layer and using your selection tool – Rectangle – draw a narrow rectangle just enough to cover middle of screenshot. Like below:
9. Duplicate layer three times. Close off top two layers and on the original layer, choose a light color from your tube as your foreground color, and in the background, use your dropper tool to select the color of your PSP screenshot.
10. Go to effects, plug ins and choose Filters Unlimited 2.0 – Pattern Generators – Audio Wave – amplitude 166 – apply.
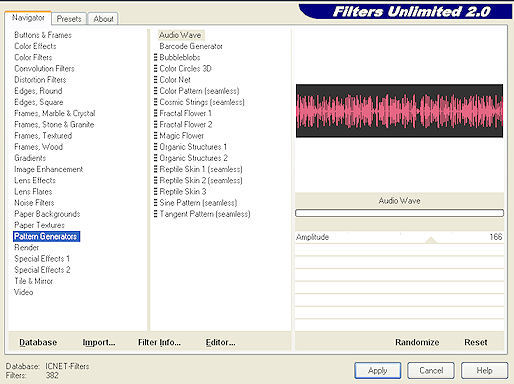
11. Move to the next duplicated layer, open and change amplitude to 188 – next layer, open and move amplitude to 198. Select None.
12. Now on new layer, add your text (I used A&S Snapper Script, size 48, light color from tube in background, 0.0, vector), copyright and license info. Rotate image into position, sharpen and add dropshadow 3,3, 50, 5.
TIME TO ANIMATE!
1. Close off first two duplicated layers of PSP screenshot, copy merged and paste as new animation in Animation Shop.
2. Back to PSP, close off original layer, open second copy, copy merged and paste after current frame.
3. Back to PSP, close off second copy, open up Copy(2), copy merged and paste after current frame. You should have a total of 3 frames in Animation Shop now.
4. Select all, animation properties, opaque – white. Then you can either choose to view your animation and save, or go to Animation Frame Properties and change to 22, save and then view.
And you’re all set! :)
Hope you liked the tutorial and please feel free to email me with your results or any questions you might have.
Email to: kiyasama@yahoo.com

Please no hotlinking the images! Neither can you use the tags created for your personal use or on blogs or websites without written permission. Tutorial has been registered under TW1.
© KiyaSama - all rights preserved. Tutorial Written 16th March, 2009.
Tutorials Home
|
|