
NOSTALGIA
SUPPLIES NEEDED:
Tube – I’m using one by Zindy S.D Nielson – you’re welcome to use tube of your choice.
Another fabulous FTU Scrap Kit from Doris called ‘NOSTALGIA’ which you can download from here – SCRAP DIMENSIONS
Mask from Weescotslass
Image/Mask/Word art by me – SUPPLIES
Font of choice or PapasNormalSwashes
Animation Shop 3
1. Open transparent image – 675 x 550 – Flood fill white and merge flatten to form background.
2. From scrap kit, open frame #2 – copy and paste as new layer. Image > Resize > 50%. Image > Rotate > Free Rotate > 90 degrees (right or left doesn’t really matter).
3. Magic wand > Mode (Add/Shift) > Match Mode (RGB Value) > Tolerance (10) > Feather (0). Click inside of frame. Selections > Modify > Expand by 20.
4. Open up ‘Nature’ image provided in supplies (or your choice), copy and paste as new layer. Selections > Invert and delete. Move this layer beneath the frame layer.
5. Go back to your frame layer. Magic wand > Click inside of frame again and expand with same settings as above.
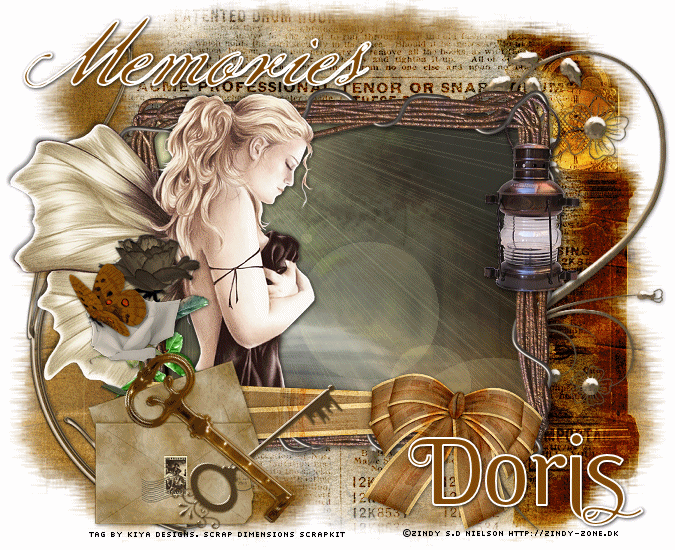
6. Copy and paste tube, moving it towards the right side of the frame – see my tag for reference. Resize by 70%.
7. To give the illusion that the sig is coming out of the frame, duplicate the tube. Move the duplicate beneath the frame layer. With this layer still active, Selections > Invert and Delete.
8. Deselect and go to the top tube layer. Using your eraser tool, carefully erase the bottom part of your tube. Once satisfied - Adjust > Sharpness > Sharpen.
9. Add a light drop shadow to your tube. I’m using 2,2,50,5 and repeat, only this time, change to -2, -2, 50, 5.
10. Choose Wrap Bow #1 from kit. Copy and paste as new layer and resize by 60%. Place below (or above depending on what kind of tube you have) top tube layer, position and add light drop shadow.
11. Choose Paper 10 – Copy and paste as new layer above white bkg.
12. Open mask provided. Layers > New Mask Layer > From Image > Choose Mask from drop down menu > Source Luminance checked. Apply. On active layer, delete and say ‘yes’ to question asked. On top mask layer, click on right click and choose ‘ungroup layers’. Resize layer by 80%.
13. Move this mask layer a bit to the right. Layers > Duplicate. Images > Mirror. Layers > Merge down.
14. Open Paper 1 – Paste as new layer above Paper 10 layer. Repeat step 12. There’s no need to duplicate this layer. Merge this layer with the Paper 10 layer once done. (Merge Down)
15. All done? Great! Now it’s time to play around with the elements. You’re welcome to use my tag as reference or you can just go ahead and add/resize whatever you want to make your tag unique.
16. Remember to add a light drop shadow to whatever element you use. I am using the settings 1,1,50,5. For the frame, use 3,3, 50,5.
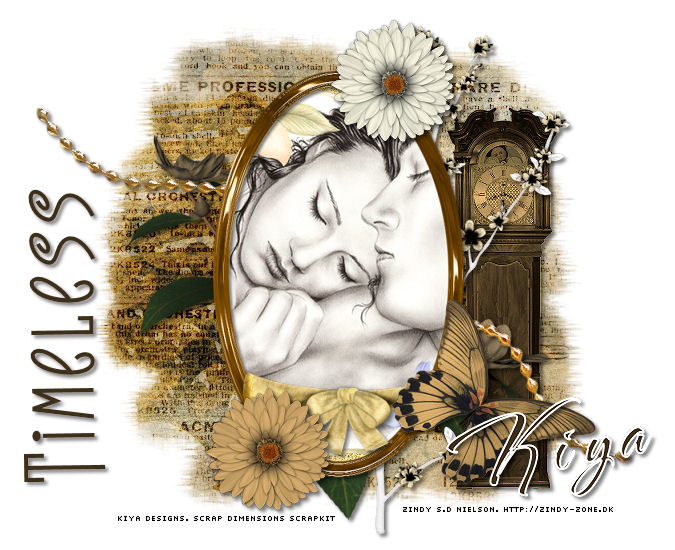
17. Note for the clock element – copy and paste as new layer on tag. Resize by 60%. Move down to top of masked layer and move towards right of tag. Double click on layer and choose blend mode as overlay. Duplicate and merge down. It gives it a ‘rusty’ feel.
18. Once done with your elements, open word art. Copy and paste as new layer at top of tag - see mine for reference.
19. Add your name, copyright info and license information. Save as .png and you’re all set. However, if you wish to animate, then proceed!
ANIMATION!
1. Go back to your ‘Nature’ layer and duplicate twice for a total of three layers. Rename Nature 1, 2 and 3.
2. Close out Nature 2 and 3. Make Nature 1 active.
3. Go to Effects, Illumination Effects, Sunburst and set to these settings:

4. Close out Nature 1. Make Nature 2 active. Go back to Effects, Illumination Effects, Sunburst and change settings to: Horizontal (32), Vertical (27), Density (25), Brightness (30), Circle Brightness (50). Apply.
5. Close out Nature 2. Make Nature 3 active. Go to Effects again and use these settings: Horizontal (17), Vertical (19). Leave the other settings as is.
6. Close out Nature 2 and 3. Make Nature 1 active. Copy merged.
7. Open Animation Shop. Right click and paste as new animation.
8. Back to PSP. Close out Nature 1. Make Nature 2 active. Copy merged.
9. In Animation Shop, Edit > Paste > Paste After Current Frame.
10. Back to PSP. Close out Nature 2. Make Nature 3 active. Copy merged.
11. In Animation Shop, Edit > Paste > Paste After Current Frame.
12. You should now have a total of three frames in Animation Shop. Edit > Select All
13. Animation > Frame Properties > 60
14. View animation and voila! All done.
15. I hope you enjoyed the tutorial. Please don’t hesitate to email me if you have any questions as kiyasama@yahoo.com.
16. Thanks for trying it out!
Please no hotlinking the images! Neither can you use the tags created for your personal use or on blogs or websites without written permission. This tutorial is registered with TWI.
© KiyaSama - all rights preserved. Tutorial Written 13th April, 2009.
Tutorials Home
|
|