
MORNING GLORY

SUPPLIES NEEDED:
Tube of Choice – If anyone knows the original artist, please let me know. I just loved the tube and had to use it.
You’re also welcome to use any other tube of your choice.
Beautiful scrap kit and masks (called Morning Glory) by the talented Sabre. You can download both mask and kit from HERE. Just go to the
freebie section to find them or scroll down page.
Plugins - Eye Candy 3.1 - Glow
Plugins - Xenofex 2 - Constellation
[Purchase or download demo here]
Font of Choice - I'm using Mr. Dafoe.
Jasc Animation Shop 3
1. Open new transparent image, 700x500. Flood fill white and merge flatten to form your background.
2. Chose SabreFrame1 from scrapkit. Copy and paste as new layer on white bkg and resize to about 80%. Sharpen. Dropshadow 1,1,50,5.
Rename it as 'mainframe' so it's easier to find later on.
3. Choose flower frame from kit. Copy and paste as new layer and resize by 60%. Move this layer beneath 'mainframe'. Sharpen. Light dropshadow. Same as above.
4. Back to 'mainframe' and using your magic wand, select inside frame. Selections, Expand by 30.
5. Choose MGSabrePaper2. Copy and paste as new layer. Resize 50%. Selections, invert, delete. Select none. Move paper layer beneath frame.
6. Go back to SabreFrame1 and select, modify and expand by 30. Copy and paste tube of choice as new layer. Resize if needed. I want to make my
tube look like it's coming out of the circle, so I'm going to duplicate it and move duplicated layer beneath the frame. Now invert and delete.
Select none and go to your top tube layer and erase the parts you don't need. Sharpen tube and apply light drop shadow to the bottom tube layer.
7. Choose the pillar element from the kit. Paste as new layer on top of your other layers and resize by 70%. Move to right side of your image, dropshadow.
8. Choose the swirl. Copy, paste as new layer, resize by 70%. Sharpen and move down til it's right above the white bkg. Move to left side of
tag. Duplicate, mirror and merge down. Apply light shadow.
9. Choose SLMorningGloryPaper2Sabre. Copy and paste as new layer right above the white bkg.
10. Select mask of choice. I used the one from the kit - layers, new mask layer, from image and choose the mask from the drop down menu. Source luminance
checked. OK. Delete and ungroup layers. The mask was too light, so I duplicated it and merged down.
11. Now, you can get to play with the other elements in the kit. You can look at my tag for references or add whatever else you like.
I just used the butterfly, resized it a few times, rotated some, and placed them all over the tag. Drop shadow 2,2,50,5.
12. I also made use of the ribbon element, resized it to 60%, same dropshadow as above and moved it to the left of the tag, moving it below
the butterfly layer.
13. You can now add your name, copyright and license info. I used the font Mr. Dafoe, 48, vector, stroke width 0.0, bkg color - black. Rotate, convert to raster and add
gradient glow, white, size 1.
ANIMATION TIME!
14. Duplicate 'mainframe' twice - you should have three frames when done.
15. Close out top two layers and on the original, go to Xenofex Constellation, Settings - Bling Bling - and use these settings:
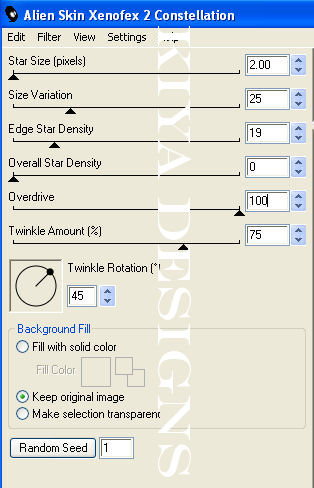
16. Close out that layer, open the next. Constellation and random seed, click twice. Repeat the procedure for the final duplicated layer.
17. Open up Animation Shop 3. Go back to PSP. Close out top two duplicated layers, copy merged and paste as new animation in AS.
18. Go back to PSP, close out original layer, open second, copy merged, edit and paste 'after current frame' in AS.
19. Do the same thing one last time, and now you should have three frames in AS.
20. In AS, Edit, select all, animation, animation frame properties, opaque - white.
21. View animation and if you like how fast it goes, you're all set! If not, go back to animation, frame properties and increase the number.
Hope you liked the tutorial and please feel free to email me with your results or any questions you might have.
Email to: kiyasama@yahoo.com
Please no hotlinking the images! Neither can you use the tags created for your personal use or on blogs or websites without written permission. Tutorial has been registered under TW1.
© KiyaSama - all rights preserved. Tutorial Written 17th March, 2009.
Tutorials Home
|
|