
GAMER
SUPPLIES NEEDED:
[You Must Have Working Knowledge of PSP!]
Paint Shop Pro Vers. 9+
Animation Shop 3
Your tube of choice. Tube(s) used for this particular tutorial is by Scott Blair. You must have an MPT license to use it.
Plug ins
Eye Candy Impact - Bevel
Penta.com – Dot and Cross
(Go to Liberta Design to search for appropriate filters)
Mask of choice or one provided in supplies thanks to Vix
Fonts of Choice or Carnasie Slab BL and Warlords
SUPPLIES
REMEMBER TO SAVE OFTEN!
1. Open up image – 650x650 – white background.
2. Unzip and open up supplies provided. Select the ‘game course’ image. Copy and paste as new layer on your canvas. Move towards lower portion of canvas (see tag for reference).
3. Resize by about 80%. Duplicate this layer. On copy - Adjust – Hue and Saturation – Colorize with a color from your tube. I used the pink (H=230, S=166).
4. Copy and paste your tube as new layer. Resize and position above game course as you’d like. Apply drop shadow of choice.
5. Use your eraser tool, and going to your game course layer carefully erase the trees at each end. When done, merge both game course layers together.
6. Choose a dark and light color from your tube. For my tag, I used the pink (##dd5fab) and set this to background, and for the foreground, I used the dark blue (#202136).
7. Go to rectangle tool – preset shapes and choose the computer shape – make your background layer active, then draw out the shape as large as you see in tag with these settings:

8. Magic wand – click inside the computer screen – selections – modify – expand by 4 – delete. Keep selected.
9. Create new raster layer. Flood fill with pink (or light color from tube). Keep selected.
10. Copy and paste DDR image as new layer – position within screen – selections – invert – delete. Change blend mode of image to soft light.
11. Copy and paste your tube again. Position within the screen. Selections – invert (to delete excess tube). Change blend mode to soft light. Deselect.
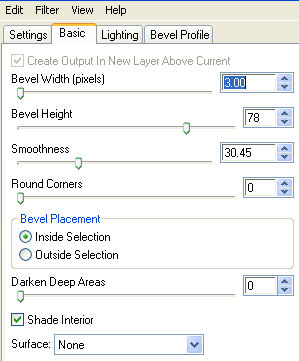
12. Click the other pink (or whatever light color) portions of your computer with your magic wand. Keep selected and use the Eye Candy Impact – Bevel with these settings:
13. Apply drop shadow of choice to your computer as well as game course layers.
14. Back background layer active. New raster layer, flood fill with gradient created with your dark and light colors.
15. Apply mask provided or mask of choice. Effects – Penta.com – Dot and Cross – Default settings.
16. Select Carnasie Slab font – stroke width (2), size (72) – foreground black, background light color from your background and write out the words ‘GAMER’ on either side (making sure it fits in the boxes). Of course this depends on whether you’re using the same mask or not. You’re also welcome to write whatever else you want. Add drop shadow of choice.
17. Magic wand – click inside each letter – duplicate this layer three times for a total of four layers.
18. Go to Adjust – Add/Remove Noise – Noise with these settings:

19. Repeat effects for next three layers only increasing number by 10 each time.
20. Add your license information and then write out your name. I used the font ‘Warlords’ – stroke width (2), size (90), foreground (black), background (pink).
21. And now we head off to animation station!
ANIMATION TIME:
1. Open up animation shop.
2. Open images of arrows provided in supplies. You should have four of them.
3. Back to PSP. Close out top three layers of your ‘noise text’ , making original layer is open. Copy merged and paste as new animation in AS.
4. If you’ve done some of my tutorials, you already know how this process goes. Repeat Step 3 for the next three layers. So in the end, you should have four layers of your tag in AS.
5. Click on the first frame – Edit – Select All.
6. Go to any of the arrows (it doesn’t really matter which, but this process should apply to all of them). Make sure all four frames of arrow is selected. Click mouse on arrow in first frame and then drag it into first frame of your tag – position it as close to its counter part on the image (as in, if you have an ‘up’ arrow, position it on an ‘up’ arrow on the image).
7. When you’re all done, view – view animation and if satisfied save!
8. Hope you had fun with this one! ^_^
Please no hotlinking the images! Neither can you use the tags created for your personal use or on blogs or websites without written permission. This tutorial is registered with TWI.
© KiyaSama - all rights preserved. Tutorial Written 21st September, 2010.
Tutorials Home
|
|