
DIM THE LIGHTS

SUPPLIES NEEDED:
[You Must Have Working Knowledge of PSP!]
Paint Shop Pro Vers. 9+
Animation Shop 3
Your tube(s) of choice. Tube used for this particular tutorial is by Jaime Kidd. You must have a CDO license to use it.
Plug ins
Filter Factory E - Perforator 1
Filters Unlimited 2.0 - Paper Textures
(Go to Liberta Designs to search for appropriate filters)
Font of Choice or Carnasie Slab JL
REMEMBER TO SAVE OFTEN!
1. Open image 650x250 – white background.
2. Open tube(s) of choice. Copy and paste main tube (preferably full-figured) and move to right of canvas (see tag for example).
3. Duplicate and close out the original tube. (Note that this step only applies to those who are using only one tube. If you’re using different tubes, then skip to next line).
4. Move duplicate tube to left of canvas, position in such a way that the lower half of tube is only visible. Duplicate and lower tube a little further.
5. Repeat step 4 until tubes ‘reach’ the original. See tag for reference.
6. Merge duplicated tube layers together. Change blend mode to Luminance Legacy.
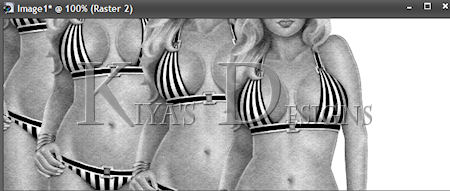
7. Effects – Filters Unlimited 2.0 – Paper Textures – Hemp Paper 2 – Intensity (66), Lightness (110)
8. You should have something like this when done.
9. Set color palette – foreground (white), background (black). Making sure textured tube layer is active, write out your text of choice. I used Carnasie Slab JL. Size (72) Kerning (200). Apply drop shadow of choice to text.
10. Open up original tube layer. Duplicate. On top layer – adjust – Gaussian blur (4) – change layer blend mode to ‘Soft Light’. Merge both tube layers together. Apply drop shadow of choice.
11. New raster layer BELOW original tube layer. Flood fill with black. Close this out for now.
12. Make your topmost layer active. New raster layer. Selections – Select all – Modify – Contract by 5 – Invert. Flood fill with black. Apply drop shadow of choice. I used (2,2,50,5). Repeated and used (-2, -2, 50, 5) second time around.
13. Write out license and copyright information.
14. The next steps will involve having to go back and forth between PSP and Animation Shop.
ANIMATION TIME:
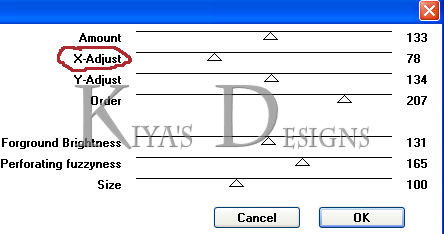
1. In PSP, make black layer visible. Effects – Filter Factory E – Perforator 1 – default settings:
2. Copy merged. Go to Animation shop and paste as new animation.
3. Back in PSP. Edit – Undo. Then repeat the Perforator effect again, only this time, we’ll be moving the highlighted slider towards the left by about ten or fifteen (I didn’t really count, just kept moving it slowly at a time.)
4. Copy merged. Go to Animation Shop and paste after current frame.
5. Back in PSP – repeat step 3 – each time moving the slider to the left until it gets to the very end.
6. When done, you should have about five frames in total in Animation Shop. This could be more or less, depending on how many times you moved the slider.
7. Select all frames. Edit – Copy. Make last frame active (click on it until you see the red line around it), Edit – Paste after current frame.
8. Animation – Reverse frames (this reverses the five copied frames)
9. Edit – Select all – Animation – Frame Properties – set to 20 or 30 (depending on how fast or slow you want it).
10. View animation and you’re all set!
11. Remember my tutorials are just basic, so you’re welcome to play around with this and come up with even more creative ideas/designs! Have fun and don’t hesitate to share your results if you want to!
NOTES FOR SECOND TAG EXAMPLE:
1. I did things a little differently with the background of this one. For starters, I didn't do the luminance legacy and simply merged all the tubes together and duplicated.
2. Make the original merged tube layer active - Plugins - Mura Meister - Copies - Wallpaper on default.
3. Effects - Distortion Effects - Wind - From Left - Wind Strength (100).
4. Make copy merged tube layer active and change layer blend mody to overlay, and then just follow the rest from step #11.
Please no hotlinking the images! Neither can you use the tags created for your personal use or on blogs or websites without written permission. This tutorial is registered with TWI.
© KiyaSama - all rights preserved. Tutorial Written 28th October, 2010.
Tutorials Home
|
|